
Highlights from Umbraco Spark 2024
Our team reflects on their highlights from this years innovation focused conference.
How do you speed up distribution of iOS builds by releasing variations of a single build in Azure DevOps?
App build pipelines involve compilation, dependency installation and other functions, and can often take time. The Shout app development team found themselves working on a project with a single codebase, and a single build pipeline, which then needed to be distributed based on 3 different apps, (with different bundle IDs, resources, environments and even Apple Developer accounts!)
Altogether, they were distributing 16 builds for each update. It was time to find a better way…
Principal Engineer Sam Miller picks up the story and walks us through a technical deep dive on how to create a ‘build once, release many’ pipeline for a mobile app using Azure DevOps.
Using a ‘build once, release many’ approach, we were able to speed up the build & deploy process up significantly, especially when an application required multiple variations / releases of the same app.
Working on a project which involved the distribution of 16 builds was very inefficient, and leveraging this approach made things more viable.
Azure DevOps provides out of the box, easy to use tools to help with automatic building and releasing for iOS. However, whether you’re using your own hosting agents or not, this can prove to be very time-consuming when releasing multiple variations of the same application.
A common use case is releasing variations of an app, targeting different environments for UAT testing, or a pre-production environment.
But it could be you are releasing an app which features variations on resources which can often lead to an app having a different name or bundle identifier or even diverse resources such as the app icon.
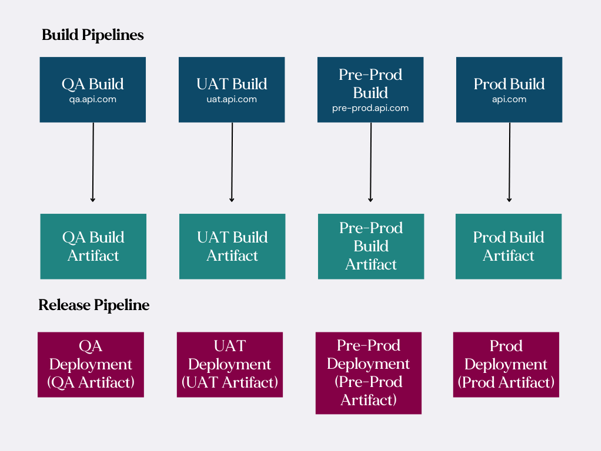
For simplicity, let’s take the common scenario where, as part of a development cycle, we are required to release a QA, UAT, Pre-Production and Production build from the same code base.
A simple solution is to set up a build pipeline which takes a codebase, and builds based on 4 different Xcode configurations / targets. This will produce 4 .ipa artifacts each pointing at their respective environment.
This could be achieved by setting up user-defined variables in the app’s build settings for each configuration and creating entries for the environment’s API base URL.
Next, we create a release pipeline whose job it is to take the artifacts and upload them to the appropriate distribution channel.
Let’s say our QA build will be distributed via App Centre and the rest of our builds are uploaded to App Store Connect for use on TestFlight and then, ultimately, the App Store.
Here's how the builds are related to the releases:
Figure 1
Whilst this is a perfectly acceptable way to automate build and release pipelines, depending on the hosted agent and complexity of the app you’re building, it can be time consuming building 4 apps.
Even more so if you’re using additional tools such as CocoaPods. Luckily, there is a way to speed this up.
When we compile and export an archive using Xcode or Xcode build, the output is a .ipa file. This is a compressed file containing the application binary, resources, metadata, and, if signed, a resource containing encrypted data.
The .ipa itself can be explored by renaming the file extension from .ipa to .zip and unzipping the contents.
Something I didn’t realise for a long time was that not only can we explore the contents of an .ipa, we are also able to modify its contents, zip it all back up and re-sign it as a ‘new’, valid .ipa.
And the magic is that the process of modifying the contents of a .ipa and resigning it is considerably quicker than building the app over again.
But there is one fundamental rule to be aware of: This approach allows modifying resource files only.
We cannot change our code as it has already been compiled, and we can’t change anything related to compilation – like the build settings.
Resource files could be an image asset, a sound file, or the contents of a JSON file. If the resource filename remains the same, you can replace / modify any of the app’s resource files.
In the case of our scenario, (ensuring that each of our builds are pointing at the correct base URL), we need to make a change in how the app knows what the base URL is. In the conventional approach, we would set a build variable to define what the base URL is for each configuration. However, we do not want to build separately for each environment, only once.
So where do we tell the app its base URL in this scenario? We use a JSON file to define our base URL.
Why? Because, as mentioned above, a JSON file is a resource file, meaning we can modify its contents after the build has been produced. Assuming our app can access the contents from the JSON resource file at runtime, we have a means to access environment specific variables without having to build multiple variations of our app.
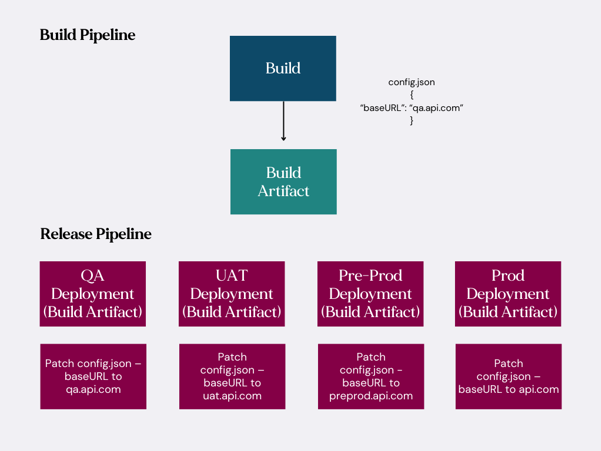
So, we need to create a release pipeline which takes the artifact, patches the JSON file for a given deployment, re-signs and finally, uploads them to the appropriate distribution channel.
Here’s how things look now. (Note the default base URL in the config file is “qa.api.com”. If we were dev testing locally, it would be this environment the app would be pointing to.)
Figure 2
Now that we understand how we can speed up distribution of variations of our app at a high level, let’s look at the tasks in DevOps we can use to achieve this on each of the deployment stages in our release pipeline.
For the sake of brevity, we’ll not cover the build pipeline as this should be straightforward.
We will focus on the release pipeline, and the tasks each stage must perform. It would take some time to go through each task in detail so whilst we can list the tasks needed to do this, we will only go into detail on those that allow us to achieve the patching and resigning of our .ipa.
Here is a list of the tasks we'll use to put our release stage together:
|
Task Name |
Task Type |
|
Install Apple Certificate |
Install Apple Certificate |
|
Download Provisioning File |
Download Secure File |
|
Unzip IPA |
Bash |
|
Patch Config |
Patch JSON Files |
|
Zip IPA |
Archive Files |
|
Create Entitlements |
Bash |
|
Resign IPA |
Bash |
|
Publish to App Store |
Apple App Store Release |
Let’s go through them one at a time.
We will of course assume that your release pipeline and stage are pointing at the correct artifact (produced by the build pipeline).
We’ll need this so we may sign our app once we have patched the resource file.
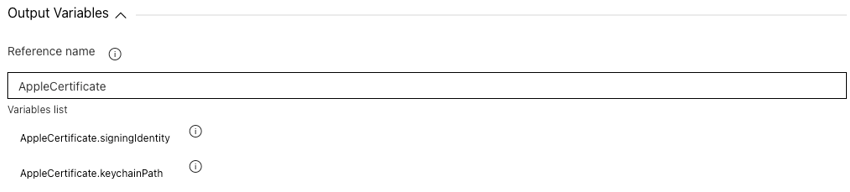
Given that we are deploying to the App Store, it will need to be a distribution certificate. Don’t forget to supply a variable name for ‘Output Variable’.
We will also need a provisioning profile as part of the signing process. This will need to be an App Store provisioning profile.
This will be downloaded from your ‘Secure Files’ under the ‘Library’.
Make sure to assign the output to a meaningful variable under the ‘Output Variables' option and make a note of the variable.

In order to explore and manipulate the contents of our .ipa, we need to unzip the file’s contents to a temporary location. This is a straightforward unzip command within the bash script which will handle this.
Below is a sample script:
unzip "$(System.DefaultWorkingDirectory)/{artifact_name}/{path_to_ipa}/{filename}.ipa" -d "$(Agent.TempDirectory)/application_files"
Fortunately, DevOps provides a task for patching JSON files so we will take advantage of this to update our base URL.
The three main pieces of information we need to provide are the working directory, the name of the file we’d like to patch, and the values in the file we’d like to patch.
Below are some samples of what should be provided:
Working Directory:
$(Agent.TempDirectory)/application_files/Payload/{filename}.app
Target Files:
config.json
Patch Content:
= /BaseURL => https://api.com
The Working Directory is the destination folder of our unzip task where the contents of our .ipa file were extracted too.
Within this folder, is the Payload folder and then the .app file which is itself a directory. Directly inside this folder, you will find all your app resources including the config.json file. Set this file as the value of Target Files.
Note that the Target Files takes a collection of files but in our case we only need to provide one file.
Finally, the syntax for patching the baseURL should be self-explanatory. The “BaseURL” being the key name in the JSON and “https://api.com” being the production base URL of our app.
Next, we use an “Archive Files” task to zip back up the contents of our app. The key settings on this task is the location of the files to be zipped which in this case is:
$(Agent.TempDirectory)/application_files/
It is also important to note that the “Prepend root folder name to archive paths” must be left unchecked.
We don’t want the application_files included in the path because it is not part of the expected structure of the zip file.
The final setting is the location of the output file. We can store it in our Temp Directory and we need to ensure that the file extension is .ipa. So something like:
$(Agent.TempDirectory)/{filename}.ipa
Given that we will eventually re-sign our app, we will need to specify the signing certificate, provisioning profile and entitlements.
We already have the certificate installed to the agent’s keychain in step 1. And the provisioning profile downloaded from our secure file library in step 2. (This is where we will need the output variable mentioned in step 2.), now we need to establish the application’s entitlements.
We do this in a bash script which will, at a minimum, have 2 commands. The first is to decode the content of the provisioning profile, and then extract from the decoded file, the contents of the entitlements node and save said contents into a new file:
Decoding Provisioning Profile
security cms -D -i "$(Provisioning_Profile_Output_Variables_Name)" >> "$(Agent.TempDirectory)/provisioning.plist"
Extract and save Entitlements
plutil -extract "Entitlements" xml1 -o -"$(Agent.TempDirectory)/provisioning.plist" >> "$(Agent.TempDirectory)/entitlements.plist"
A brief explanation of what is happening here. We use the Mac utility “security” to decode the contents of the provisioning profile.
If you press the space bar on a Mac with a provisioning profile selected, it will show the content in a human readable format. If you try to open it in an editor, it will not be decoded.
Hence the need for decoding so we may extract the relevant information and save to a temporary .plist file.
Finally, we use “plutil” to read the contents of the entitlements node from the temporary .plist file and save to another temporary .plist file.
This provides us with the content we need to be able to specify our entitlements when we re-sign the app.
As a sanity check, it may be worth adding an additional command to the end of this bash script to output the contents of our entitlements file in the release pipeline so we can confirm that all the values have been extracted and saved correctly.
You can do something like the following:
plutil -p "$(Agent.TempDirectory)/entitlements.plist"
The final step before distributing our app to the App Store.
We will be using Fastlane (which is provided by Devops) within a bash script to run their signing tools which will produce our final .ipa file.
It requires 5 input values:
fastlane sigh resign "$(Agent.TempDirectory)/{filename}.ipa" \
--signing_identity "$(AppleCertificate.signingIdentity)" \
--provisioning_profile "$(ProvisioningProfile.secureFilePath)" \
--new_bundle_id "com.company.app" \
--entitlements "$(Agent.TempDirectory)/entitlements.plist"
Finally, we add a task for uploading our re-signed .ipa to App Store Connect. There isn’t a lot to cover here as it’s a straightforward task to add.
We just need to ensure that we are pointing at out our re-signed .ipa when specifying the ‘Binary Path’ and supply the task with the correct ‘Bundle ID’.
It’s time to test our release pipeline.
You may recall that in our example, we pointed out that the base URL for the app in our source code was ‘qa.api.com’.
This means that if we run a basic build pipeline to compile and produce an initial .ipa, it will be pointing at our QA environment.
This can be verified by downloading the .ipa from Devops and exploring the contents of the ‘config.json’ file.
The next step, is to then run our new release pipeline by specifying our build as the artifact to release, which will patch the ‘config.json’ file and replace the QA URL with the production one.
On a successful release, we can analyse the pipeline once it has finished and view the details of each individual task included the ‘Patch Config’ task.
This will allow us to see the contents of the file after the patch, to demonstrate that the patching has worked correctly.
Sometimes the solution to make a complex process more straightforward is a deceptively simple one – like using a script to update a JSON file.
Over the course of the app’s lifetime, this approach has saved us (and our client) 100s of hours waiting for builds to complete.
Proof indeed that the most impactful innovation is not always glamourous!
If you’re looking for support with your deployment pipeline – or any other aspect of App development, talk to us.
Our team reflects on their highlights from this years innovation focused conference.

When you've taken steps to optimise your customer journey, why can conversion seem so difficult to grow?

Transforming the ICO's subject access request process with a simple online self-service process.