Goodbye blur effect, hello Liquid Glass. Here's how to get the best from Apple's bold new design language.
Apple has moved away from the old blur effect, and it’s time for the new dynamic material: Liquid Glass. We’re not going to lie it looks stunning. From shimmering edges that catch the light as you move your phone to the subtle glow that appears when you interact with elements, it brings the UI to life. Of course, there are considerations around accessibility and the battery cost of rendering such effects, but we'll delve into those in a future article.
We’re going to be looking into how to apply the Liquid Glass effect to views along with the different options available for customising it. Let’s start!
New modifiers
Before we start building let’s look at the new modifiers that’ll help us implementing liquid glass.
Text("Hello, World!")
.padding()
.glassEffect()
//.glassEffect(.clear)
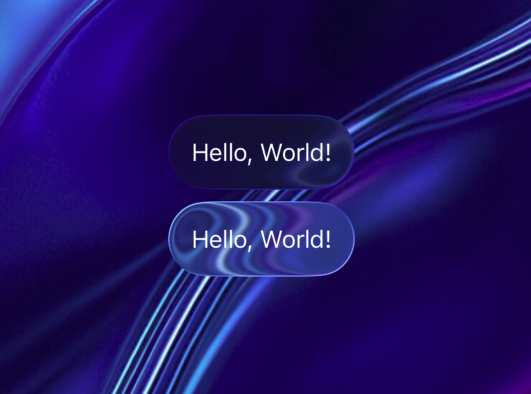
The first one is simply .glassEffect() which applied the effect to any view just like the background color. You would have to make sure you add padding to the view you’re applying the effect to so that it doesn’t hug the text just like when applying a background color.
By default it applies the .default effect but we can also change it to apply .glassEffect(.clear) to make it more transparent.
Let’s look at the definition of this modifier and understand the other parameters parameters
func glassEffect(_ glass: Glass = .regular, in shape: some Shape = DefaultGlassEffectShape()) -> some View
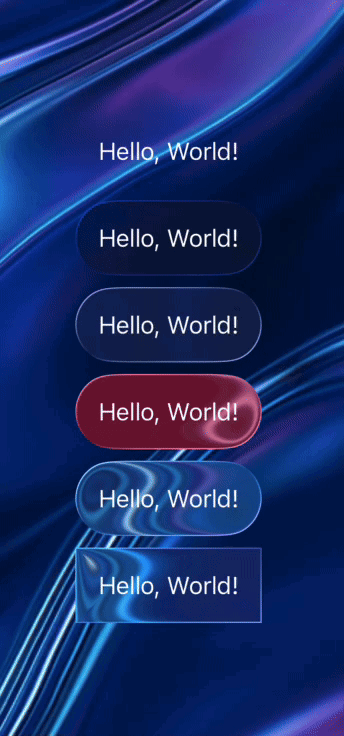
Glass
This parameter controls the effect of the liquid glass applied to the background of a view. there are 5 customisation options that we can use:
The advisor experience
So, what does this look like in practice? The examples below show the customer and advisor-centric designs that were delivered as part of an internal transformation project for a London-based water provider and showcases some of the different ways in which we worked with the advisor staff to anticipate their needs and the goals of their callers, translating their requirements into an intuitive and responsive solution that surfaces information from multiple sources into a single platform.
| Glass type | Use |
| .identity | Use this to get no glass effect. |
| .regular | This type gives you a Frosted glass effect. |
| .clear | This one gives you the most transparent version of the glass effect |
| .tint(_ color: Color?) | This modifier on a Glass type lets you provide a tint to the liquid glass effect |
| .interactive(_ isEnabled: Bool = true) | This modifier on Glass type makes the Liquid Glass respond to user interactions |
Shape
This parameter lets you define what shape the glass effect would be applied to for example: Circle, Rectangle etc. By default it uses the DefaultGlassEffectShape() which comes out as a Capsule.
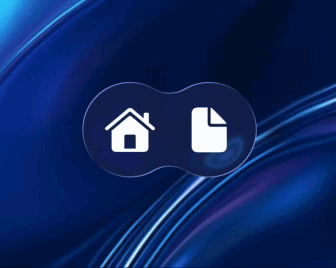
GlassEffectContainter
Moving on from the modifier we come to the newly introduced container view called GlassEffectContainer, This view combines glass shapes into a single shape the can morph individual shapes into one another, think two water droplets merging together that’s what the views when near enough inside a glass effect container view will look like.
To see this in action, place two images inside a GlassEffectContainer and animate the spacing between them. As the distance shrinks, the glass views visually merge, creating the effect of morphing into one another. Expanding the spacing reverses the effect, letting them separate back into distinct views.
GlassEffectContainer(spacing: 40.0) {
HStack(spacing: animate ? -20 : 40.0) {
Image(systemName: "house.fill")
.frame(width: 80.0, height: 80.0)
.font(.system(size: 36))
.glassEffect(.clear)
Image(systemName: "document.fill")
.frame(width: 80.0, height: 80.0)
.font(.system(size: 36))
.glassEffect(.clear)
}
}
.foregroundStyle(.white)
}
.onAppear {
withAnimation(.easeInOut(duration: 2.0).repeatForever(autoreverses: true)) {
animate = true
}
}
GlassEffectTransition
Inside a GlassEffectContainer, we can also apply a transition to a view so that it morphs in and out of nearby views when it’s added or removed from the hierarchy. Most of the code stays the same the only difference is that instead of adjusting the offset, we’re simply showing or hiding views with an if statement.
To make sure the transition works just like other transitions we’d need to make sure the views are in same namespace. Once that’s set up apply the transition using the .glassEffectTransition modifier with the .matchedGeometry option. Without .matchedGeometry the effect won’t look same the view will simply appear from nowhere rather than emerging from the origin view.
GlassEffectContainer(spacing: 40.0) {
HStack(spacing: 40.0) {
Image(systemName: "house.fill")
.frame(width: 80.0, height: 80.0)
.glassEffect(.clear)
.glassEffectID("house", in: namespace)
if animate {
Image(systemName: "document.fill")
.frame(width: 80.0, height: 80.0)
.glassEffect(.clear)
.glassEffectID("document", in: namespace)
.glassEffectTransition(.matchedGeometry)
}
}
}
.foregroundStyle(.white)
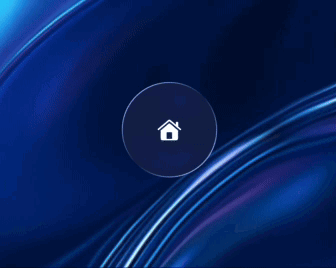
The only visual difference here is that the view scales down as it transitions into the persistent view merging smoothly into it and then scales back out when emerging from it. We won’t go into the details of how the other transitions work and the differences between them, I’ll leave that for another in-depth article.
Conclusion
That’s all for now on working with Liquid Glass and seeing how it fits into our views. It feels like a big step toward interfaces that are responsive and alive, perhaps a step into design language that’s ready for spatial computing.